- TREASURE EVERY CENTIMETRE: Space and Light form the raw materials of our homes. A well-designed home is one where every centimetre of space is used to meet your needs!
- OPTIMISE: I believe in the optimal solution. This entails making the most of what you have, whatever your particular circumstances.
- MINIMAL OUTLAY: For some, the optimal solution may mean minimal or even no outlay. Improvements will always be possible, whatever your budget and circumstances.
- MODEST OUTLAY: A bigger budget will allow you to undertake more significant adjustments, including structural alterations, changes to interior layouts and interior finishes and fittings.
- MAJOR OUTLAY: Extending your home may be the only option, where the existing space cannot be configured to meet your needs. Finding the best layout for your new space, as well as linking it seamlessly to the existing, is key.
- PLAN: In all cases, strategic thought at the outset will ensure that you gain maximum return for your effort and outlay. Layout is key. Take control of your space so as to shape it to your own needs!

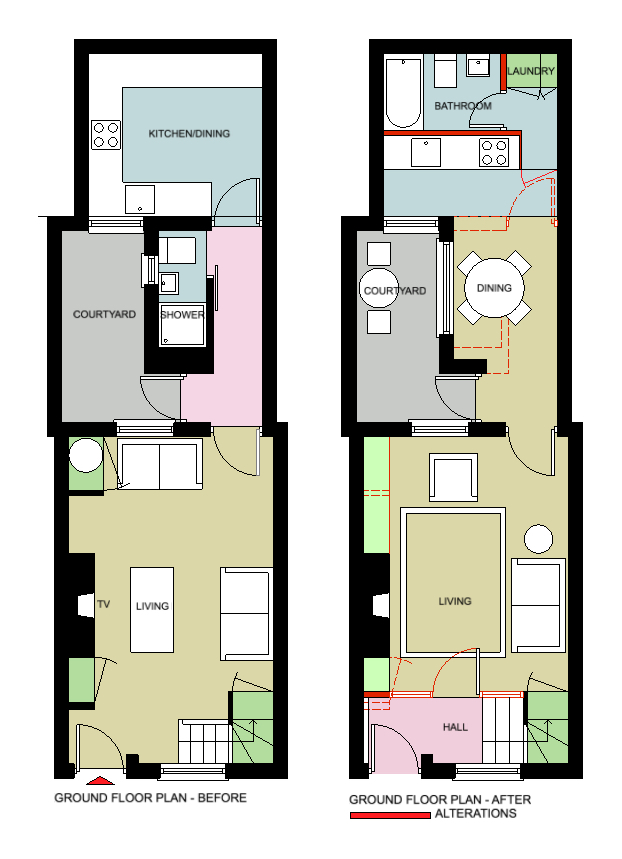
- LAYOUTS: Assess your furniture layouts. Re-arranging/re-allocating furniture can have a profound effect on how you experience and use each room. Can a door or radiator be re-located to make better use of the space? Read my advice on each room under the Advice Menu.
- DECOR: Assess your colour schemes. Lighter, unified colour strategies will maximise the sense of space as well as light.
- STORAGE: Assess and address your storage needs. Reduced visible clutter will enhance your enjoyment of the space available.
- ROOM USES: Re-allocating room uses can be refreshing and transforming. You’ll need to step back from how your home is currently used to make progress here. Firstly, assess the use to which each room is put. Then, state your needs, and the needs of each member of the household. Compare the list of your needs with the list of rooms available, at both ground and first floor levels. Be radical in your approach. Make every room work hard as hard as possible. This will contribute to a heightened sense of space in the house as a whole. Do not assume that first floor rooms can only function as bedrooms. First floor rooms are always brighter and therefore very suitable for dens or home offices.
- COMBINE SPACES: Where you need a larger space, explore how adjacent spaces might be joined by removing the wall between the two. This may allow you create a Kitchen/Dining/Family Room overlooking the garden.
- ENLARGE OPENINGS: Space and light are inextricably linked so bigger windows and doors will further enhance the sense of space. You will also maximise the relationship between indoors and outdoors.
- CONNECT ROOMS: Opening up between the front and rear rooms on the ground floor can improve the flow of light through the whole of the ground floor. You might also allow a north facing back room benefit from the daytime sun in the front room. Double doors between the two rooms will allow each room be used separately when required. For optimum flexibility, provide sliding doors in this situation, preferably sliding into a recess created by a twin wall. Pocket doors are a great solution here. Solid sliding doors will provide visual and acoustic privacy for each room when closed over. Make sure you put an architrave about this enlarged/new opening so that it blends seamlessly with your existing doors and openings.
- DOOR CHECK: Re-locating a door is a minor alteration which may have a huge impact on a problem room. Likewise, changing the side on which a door is hinged – and so the direction in which the door opens – can greatly improve the sense of space and the usability of many rooms.
- SEEK ADVICE: Always seek professional advice when undertaking structural changes internally, for example where you plan to remove a wall or to increase the width of an opening significantly.
- Sunday Independent: Can We Organise Our Chaos?
- MAXIMISE EXISTING SPACE: Do you really need an extension? Are you using your existing space well? Can you make alterations to your existing layout?
- MAINTAIN FLOW: Where you have no option but to extend, make sure that the extension and existing house will ultimately work together to meet all your needs and answer all of your identified issues.
- HARNESS THE SUN: Use the sun as your starting point when planning where to place and how to configure your extension. Explore how the extension might allow you to gain new sources of sunlight. For example, a north-facing house might gain west or east facing spaces where the extension does not extend the full width of the house.
- CREATE QUALITY SPACE: Take the opportunity, especially with a single storey extension, to provide an enhanced quality of space. You can go beyond simply replicating your existing space. For example,
- Increase the floor to ceiling height in your extension. Anything above the statutory minimum height of 2.4 metres improves the quality of space hugely.
- Where you plan a pitched roof, don’t assume the ceiling will be flat. Explore how you might “sculpt” a vaulted or slanted space making a ceiling that follows the shape of the roof.
- Exploit the potential to provide windows in the roof (roof-lights) overhead. Roof-lights might also help to capture sources of sun not previously enjoyed by the house.
- Where the part of the house to be extended faces north, enjoy the fact that a single storey extension will not decrease the amount of sun reaching the garden. This will allow you to improve the relationship between the house and the garden at no expense to the sun.
- AVOID A MIDDLE ROOM: A room in the middle of the house, with no independent source of natural light is likely to be dark, unloved and unused.
- DON’T OVERWHELM: Be aware of the relationship between the existing house and the extension in terms of proportions. Avoid overwhelming the original with the new in terms of scale.
- COMPLY WITH REGULATIONS: Be aware, from the outset, of the need to comply with Building, Planning Regulations and Health and Safety Regulations. Guidelines regarding planning issues are contained in the leaflet PL5. Doing Work Around the Houses – The Planning Issues, which may be downloaded from www.environ.ie.
- SEEK ADVICE: Engage an architect, where possible. Include the cost of fees in your budget from the start. Do not consider this outlay an added luxury. It should be an intrinsic part of your strategy for what will possibly be the greatest investment in your life. Expect to recoup the expense in many years enjoyment of a space designed and sculpted to your exact needs, now and into the future.
Download the info-packed leaflet, “Loft Conversion: Protect Your Family” before undertaking an attic conversion. See also Loft Conversion Leaflet Amendments.
- LEVEL ACCESS: Allow for the floor to your converted garage to be level with the main house. This will allow the room to feel like an integral part of the main house.
- INSULATE: Ensure the room is sufficiently insulated and heated to be on a par with the rest of the house.
- LAYOUT: Locating the door from the main house is a strategically important decision. Make sure it allows you to configure the space in a way that is useful relative to your intended purpose. Typically it will be a Home Office/Study, Play Room/Den.
- PROPORTION: Converted garages are often narrow, with a typical width of 2.2M. This makes them challenging to furnish. Choose furniture carefully relative to the size of the room.
- OUR HOUSE: The TV/Study in our original house measured 2.2 x 3M, equivalent to a typical converted garage. This room served us well, acting as Play Room, Guest Room and TV Room/Home Office/Guest Room over the years.

- EARLY TEENS: Our children are now 19 and 21 but during the pre-teen stage, we re-organised our spaces to suit our family’s changing needs. The children needed space to be on their own/with friends and we needed the odd moment of quiet. This presented a challenge in a house that is primarily open plan on the ground floor.
- KITCHEN/DINING: We re-located our 3 metre long dining table to the kitchen/dining/family area which can be closed off from the main part of the house with sliding screens.
- GAMES & CRAFTS: We moved the smaller, 1.5 metre long table to the central dining area, for arts and crafts use. This allowed us to fit a multi-purpose games table here also.
- TV/STUDY: The small first floor room which functioned previously as a Play Room became a bedroom. The larger of the two front rooms became a TV/Study area, providing a sunny work and relaxation space removed from the main body of the house.
- NO OUTLAY: These minor adjustments to our furniture arrangements improved our enjoyment of the house hugely, prior to building an extension. And for no outlay.


- ORIGINAL HOUSE: Our original house was open plan on the ground floor, with a small TV Room/Study on the first floor. We were reluctant to change the open plan arrangement downstairs but knew that we needed to have a separate space as a Teenage Den.
- ATTIC: We had no space to extend to the rear, so we added a partial attic level with a Master Bedroom, Ensuite, Dressing and Study areas.
- TEEN DEN: This allowed us to combine the original two front rooms at first floor level into a teen den, with access to the south-facing terrace.
Looking for Space Design Ideas for your House?
CONTACT Eva to arrange your personal House Consultation.